Let’s look at how to sew shibori seaweed. And at the same time learn another shibori technique, awase ori-nui. This is a way of working that involves creating a pleat in the fabric and sewing through 4 layers of fabric.
I hope these explorations will inspire you to get stitching and perhaps create a seaside scene. You can utilise some of my shell patterns too, to create a larger design, all available in my shop. Or add a few simple fish shapes.
I am inspired in my seaweed designs by beach walks but also by Molesworth and Bird who press seaweeds and make beautiful prints. Here is their website.
Sew Shibori Seaweed – Two Designs
Both designs use awase ori- nui stitch. Here is a description of the stitch
Working on the reverse of the fabric, using thumb nail and forefinger, make a sharp fold in the fabric, along the centre line of each seaweed frond. Returning to the front side of the fabric, fold along the other two lines bringing them together. Taper the fold at both ends pushing the centre fold down in between the two lips.


Begin the running stitch on the very edge of the fold, just a fraction away from the beginning of the seaweed lip. Gradually widen out the line of stitching to 2-3mm / 1/8” away from the fold stitching through four layers of fabric. At the end of the frond take care to taper off again to finish. Take the last stitch just beyond the point where the fold ends to bring the needle out through the fold of the fabric.
First Pattern

To begin, draw the pattern on to your fabric. Create 3 fronds using awase ori-nui as described above. Make the fourth line with maki-nui shibori, a simple oversew stitch. Here is an image of how to create the stitch.
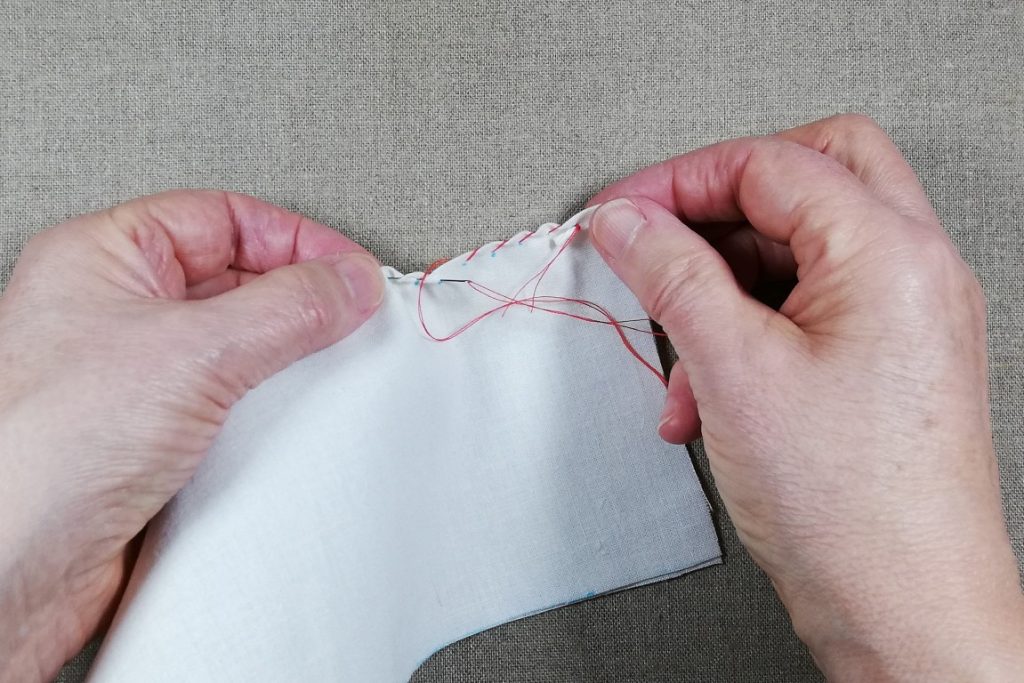


Finally, gather the stitching up, row on row. To hold the stitching tightly tie another small tag at the end of the row. Thereby creating a strong resist to the dye. This design is dyed with Rit dyes.
Second Pattern

Firstly, draw the design on to the fabric. Sew 4 fronds using awase ori-nui as described above. Next, bind a small bead in at the lower edge of the fronds. Lastly, add the stem. Stitch small running stitches close to the line of the fold in the fabric to create the stem. The fold follows the curved line drawn on the fabric.


Finally gather up the stitches ready for dyeing once all the stitching is complete. This design was dyed with golden rod giving a lovely bronze gold colour.
For more seaweed patterns see this blog post.
And for more information BUY MY BOOK. The book is full of useful, clear and step by step explanations of all shibori stitches.
FREE Shibori Pattern Guide

Join my newsletter mailing list and download a FREE pattern for a Eight Petal Flower.